Video: How to Convert Your Sig Sauer P365 to P365 X-MACRO: Step-by-Step Guide
In this educational video we will review how to convert a Sig Sauer P365 standard model to a P365 X-MACRO.
All right so let's get to it this video is about changing the standard P365 and swapping out the frame and the slide to make a P365 X-Macro. This allows you to have both versions of the firearm without having to actually buy and register two different weapons. I got this P365 for my carry weapon and the handle is a little bit small for my hand, and I would like to swap this out for an X Macro grip which is bigger and will fit my hand better.
Before starting this process, we're going to clear the weapon and make safe. Also please observe the universal rules of gun safety, meaning:
- Treat all weapons as if they were they're loaded even if you have just unloaded them.
- Never point the firearm that anything you're not willing to destroy
- Keep your finger off the trigger and outside the trigger guard until you're ready to shoot
- Know your target, what's behind, in front of, and around the target
So, to clear and make safe press the magazine release and eject the mag. Then rack the slide back and physically and visually confirm that your chamber and the magwell are empty. I like to take all live ammunition out of the room before I start cleaning or working on my weapon, and I advise you to do the same.
Again, even though we just cleared this weapon we're still going to treat this gun as if it was loaded.
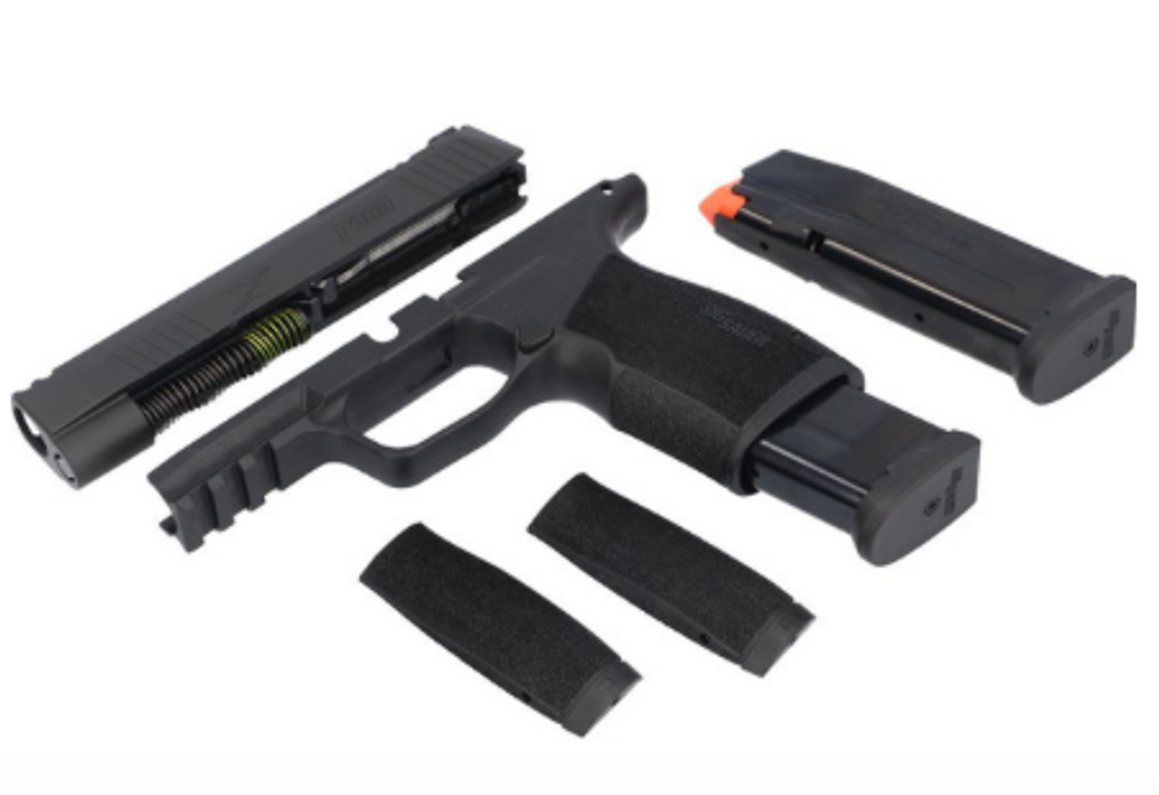
The particular P365 used in this video comes with a manual safety. The video will be applicable to both versions, with or without manual safety. Let’s review the parts needed to make this modification. We are using original Sig Sauer parts, and I have included a link to the kit you can purchase that includes all of these parts: SIG SAUER Cal-x Kit P365x-macro 9mm 17rd.
- P365 X-Macro grip module (there are both variations, with and without manual safety. Note, if your fire control unit or FCU comes with manual safety, and you have a grip module that does not have a manual safety cutout, you can easily Dremel the grip module to create the cutout yourself.) The grip module also comes with two additional back straps that you can swap out depending on your specific hand size
- The P365 X-Macro slide. In this video we use a Spectre Comp slide, which has several benefits:
- It has a built in compensator that reduces muzzle rise considerably
- It works with the original P365 3.1 inch barrel, so you will not need to buy a 3.9” barrel. Note: You can use other slides made for the X-Macro, but you may have to change your barrel to a 3.9” barrel if those slides cannot accommodate the 3.1” barrel.
- P365X Macro magazines: The standard P365 10-rd magazine does not work with the X-Macro model. You’ll need to purchase 10-round or 17rd magazines that work with X-Macro.
- You’ll also need a new recoil spring that works with 3.1” barrel and the Spectre Comp slide
One thing to bear in mind is that the X-Macro and the standard P365 do vary quite a bit in size, so that will have an effect on the concealability of this weapon once we make the change. It’s not necessarily a bad thing, but just something to consider and make proper adjustments in your how you wear your weapon. Also normally the holsters for P365 won’t work with the X Macro version and vice versa, so you’ll likely need to purchase a different holster.
So to sum up, here are the pros and cons of making this change:
Pros:
- More stable shooting platform due to compensator slide, bigger grip, and slightly increased weight
- Easier to grasp, aim, and shoot accurately and rapidly
- Increased firepower and capacity from 10+1 to 17+1
Cons: Increased size, which may affect concealability
Another issue to note, if your P365 comes with a magazine disconnect, the X-Macro grip module will not fit your Fire Control Unit (FCU) right out the box. You’ll need to do one fo the two things:
A.You can Dremel to make space for the magazine disconnect apparatus
B.You can remove the magazine disconnect.
Ok, now that we have all the things we need, let’s get to the step by step guide:
- Rack the slide back and lock to open the chamber
- Rotate the takedown lever to the 6 – 6:30 position
- Release the slide and slide it off the frame
- Remove the recoil spring and barrel from the slide.
- Install the barrel onto the Spectre Comp slide
- Install the NEW X-MACRO recoil spring on the spectre comp slide assembly. Make sure to install the right way, as the recoil spring is directional.
- The front (muzzle side) of the recoil spring must be able to freely go in and out of the recoil guide rod opening in the front of the slide.
- Remove the FCU from the P365 grip module. You’ll need to punch out the pin at the rear of the grip module (close to the beaver tail), then pull out the FCU.
- Reset the takedown lever to the 3 o’clock position: push up on the slide lock lever, which allows you to reset the takedown lever to the 3 o’clock position.
- Insert the FCU into the X-Macro grip module, then secure in place with the pin you punched out earlier in step 8.
- Push up on the slide lock lever, then rotate the takedown lever back to 6 o’clock position.
- Install the Spectre Comp slide assembly on to the X-Macro grip module.
And voila! You now have yourself a P365 X Macro. As this “new” weapon has the same serial number as your standard P365, you do not need to register a new firearm. So you basically currently own 2 firearms in one.
We hope you found this article helpful. Please check our blog regularly for new helpful articles on firearms, ammunition, and more.
Happy Shooting!
Recent Posts
-
What the LA Protests Are Reminding Us About Self-Defense: Lessons from the Past, Tools for Today
Los Angeles is once again the stage for widespread protests—many peaceful, but some escalating into …Jun 12th 2025 -
Top 7 California-Compliant Handguns for 2025: A Comprehensive Guide
California is known for some of the strictest gun regulations in the United States, which can make c …Jan 12th 2025 -
Best Concealed Carry Handguns of 2025 by Caliber: Find the Perfect Fit for Your Needs
Choosing the right concealed carry firearm can be overwhelming, especially when considering the vari …Jan 6th 2025


